"My friend asked me if I wanted a frozen banana. I said "No. But I want a regular banana later, so... yeah."
-Mitch Hedberg
It's officially autumn, and maybe you're already feeling a little nostalgia for the bygone days of summer. Or maybe you live in the Southwest, where the days are still quite warm. In either case, I would like to share an easy, healthful recipe that makes a perfect breakfast, afternoon snack, post-workout treat or dessert.
You will need to plan ahead a little bit and peel and freeze a ripe banana (this is the perfect thing to do when you have a few sitting on your kitchen counter that you fear might not get eaten in time), and then buy a mango and let it ripen for a few days. After that, all you need is a can of coconut milk. Just three simple ingredients. I really like to use the Magic Bullet blender, because it's the perfect size for this recipe. Here are the proportions:
1 frozen ripe banana
1 ripe mango, peeled and chopped
1/2 cup coconut milk
Place all the ingredients in the blender and blend until it's a creamy consistency. It will be thick and pudding-like, but it doesn't keep for very long without separating, so blend it right before serving.
One common source of confusion I've noticed among readers who post comments on cooking blogs is that many people (understandably) think that coconut milk is a dairy product. However, the term is a misnomer; it's not milk at all, but finely shredded coconut that has been soaked in hot water and strained through a mesh cloth to obtain a white, creamy liquid. It's completely vegan and offers some interesting health benefits. According to multiple informational websites, including this one, coconut milk contains lauric acid, which provides a boost to the immune system, and although it is high in fat, its chemical makeup is such that the fat is burned more easily than other types of fatty acids. Perhaps most perceptibly, it is cooling, delicious and filling. I find it to be a perfect snack after an intense yoga practice and I hope you will enjoy it, too.
One last note: We had a little technical glitch a few days ago, and you might have received an e-mail that promised you an entry about mulligatawny soup. We apologize for the blank e-mail, but we will make good on that promise and write you all about our mulligatawny soup adventure very soon. We think it'll be worth the wait, so please stay tuned...
Sometimes after a demanding week at work, when my day off comes I wake up and want nothing more than to start a leisurely sunlit morning baking in the kitchen and listening to music. Today I woke up thinking about scones, one of my favorite indulgences whether sweet or savory.
I didn't want to do a scone that had any eggs in it, so I started by sleuthing around a bit online. I found a recipe for scones, sans eggs, originally published in Bon Appétit magazine and available at epicurious.com, and was impressed. It involves a different series of steps than I was familiar with from drop scone recipes I have made before. It is instead a wedge scone recipe, and before baking melted butter is brushed on, and a mixture of sugar and lemon zest is sprinkled on top. Those are the basic concepts I kept from the recipe before customizing it. I was in the mood for pear blueberry scones because I had a big juicy anjou pear I wanted to use. I decided to cut back on the amount of lemon zest suggested in the original recipe so that it wouldn't dominate the other fruit flavors. I used Sucanat instead of a refined sweetener and I think it worked really well.
I also used a new flour I was excited to try. Last time I was at Whole Foods I was looking for an unrefined all purpose flour and found Bob's Red Mill Organic Hard White Whole Wheat Flour which they explain is a recent innovation: a new variety of wheat is used that grinds into a much lighter flour than traditional whole wheat flour. I always have felt conflicted about using whole wheat flour in baking recipes because though I really want the health benefit of the whole grain, I dislike the added density that seems inevitable. But this flour is amazing. It is indistinguishable from all purpose white flour as far as I can tell.
Most importantly, I should mention that these scones turned out truly amazing. My friend and I had them with tea, and she said that they were the best scones she has ever had. Now I am tempted to purchase a proper cast iron wedge scone pan so that I can continue on a quest for ultimate scone perfection.
Pear Blueberry Scones
Ingredients: 2 cups all purpose flour 1/4 cup plus 2 T. Sucanat 1 T. baking powder 1/2 tsp. salt
1 large pear, cored and chopped 1/3 cup frozen blueberries 1 T. lemon juice 2 tsp. grated lemon peel 1 1/4 cups heavy cream
3 T. unsalted butter, melted
Method: Preheat oven to 425°F. Stir the lemon juice into the blueberries and put aside. Mix 2 cups flour, 1/4 cup sugar, 1 T. baking powder and 1/2 tsp. salt in large bowl. In a second bowl, mix the cream, pear, blueberries, and 1 tsp. of the lemon zest. Add this wet mixture to the dry ingredients and stir just until dough forms. Turn dough out onto lightly floured surface. Knead gently just until dough holds together. Form dough into an 8 or 9 inch diameter, 1/2-inch-thick round. Cut into 8 wedges.
Transfer wedges to large lightly greased baking sheet, spacing evenly. Combine remaining 2 T. Sucanat and 1 tsp. lemon peel in small bowl. Brush scones with melted butter. Sprinkle with Sucanat mixture. Bake scones until light golden brown, about 15 minutes. Transfer to rack and cool slightly. (Can be prepared 1 day ahead. Cool completely. Wrap in foil; store at room temperature.) Serve the scones warm or at room temperature.
For a while, Wholefoods was offering a delicious quinoa salad in their prepared foods section. When I ate lunch there, I invariably chose this dish because I would be craving that sweet-tart flavor (and probably the nutritional value of the quinoa) at all other times, and eventually I started buying larger quantities to bring home for the rest of the week. However, the retail price of $8.99 per pound (!) was really starting to add up. On top of that, they didn't always have it, so sometimes I was left standing there in front of the case, hoping upon hope that I had just missed it the first time I looked, scanning the dishes over and over again until I resigned myself, dejectedly, to finding something else to eat.
In an attempt to make this menu item more readily available and economically sustainable for me, I wrote the store an e-mail requesting the recipe. Although I received a prompt, polite response from the store manager, I was disappointed - dismayed, even - with the answer. Apparently, they were "unable" to share the recipe. That was hard to swallow, because "lemon cranberry quinoa" had become my favorite thing to eat and because I had heretofore been spoiled by the helpfulness of the Wholefoods staff. This policy, however, was blatantly, purposefully unhelpful.
Since seeking employment at Wholefoods solely to acquire this recipe seemed a little too extreme, Plan B was to try to figure it out myself. Although I had the list of ingredients from the print-out label that the employee stuck on the container, this task was not as easy as it might sound; proportions are everything. Yet finally, after multiple attempts that fell tragically short of the original, I have come up with a very acceptable re-creation. Perhaps there is no greater teacher than the process of trial and error.
All melodrama aside, now I make this almost every week, and I am proud and excited to share it with you.
Ingredients:
1 cup yellow quinoa
1 cup water
2 T. lemon juice
1/2 T. ground coriander
1/2 T. ground cumin
2 tsp. paprika
1/2 tsp. sea salt
pepper to taste
Half a red pepper, deseeded and finely chopped
1 bunch (about six) green onions (scallions), thinly sliced
1/2 cup sweetened dried cranberries
1 large handful fresh cilantro, finely chopped
Method:
Soak your quinoa in a bowl of water and rub the quinoa between your fingers a bit to help remove the bitter-tasting saponin that the seed uses as its natural defense against insects. Rinse and drain the quinoa a few more times before cooking.
Bring the quinoa and water to a boil in a covered saucepan, then reduce the heat and simmer for 13 minutes. Set a timer, because mushy, overcooked quinoa really doesn't work for this recipe. If, after 13 minutes, there is still any water left in the saucepan, drain it. Transfer the quinoa to a bowl and allow it to cool.
Toss the cooked quinoa with the lemon juice. Add the coriander, cumin, paprika, salt and pepper and stir to coat evenly. Add the pepper, green onions, cranberries and cilantro and stir to combine.
You can serve this at room temperature or chilled. I usually double this recipe because it keeps well for several days in the fridge and I love having it on hand for lunch. My husband likes to take it with him to work for lunch, too.
Every once in a while on a Sunday morning I'll wake up with an appetite for some pancakes. Although nothing really compares to making pancakes from scratch, Arrowhead Mills makes a delicious Multigrain Pancake and Waffle Mix that is quick and simple to throw together when I'm still bleary-eyed and hungry after sleeping in. This way I can have my pancakes... and my lazy morning, too.
I initially chose this mix because it does not contain eggs, nor does it call for any. It is not vegan because it contains buttermilk and whey, but if, like me, you're trying to keep the eggs and dairy in your diet to a minimum, this is a great choice. The pancakes are delicious, with a bit of a cornmeal flavor that I love. All you need to add is almond milk (or soy or rice milk) and oil. I use grape seed oil because it has a neutral flavor and because it is known to have some health benefits, such as increasing antioxidant levels in the body. As an aside, you may have heard that there is some controversy about negative health effects associated with another common choice, Canola oil. Canola oil (initially a trademarked term, which is why it is capitalized) is extracted from a genetically engineered version of the rapeseed plant, but the claims about its detrimental effects are widely disputed. Because the idea of genetically modified food freaks me out a little, while the jury is still out I'll stick to grape seeds.
Combine 1 1/2 cups of the pancake mix with 2 tablespoons of grape seed oil and 1 cup of almond milk, adding more milk as necessary. Just before cooking, stir a half cup of fresh blueberries into the batter. (If you're using frozen blueberries, soak them in some hot water for a few minutes to defrost before using.) Then proceed as usual to cook the batter. This makes enough pancakes for two people.
I like to serve the pancakes with some fresh orange banana pineapple juice, which I make in my VitaMix blender. I'll write a separate post soon on making juice with a VitaMix, so for now I will just say this: Unlike other kinds of juicers, which extract primarily only the fruit's water and sugar for you to drink, leaving the pulp fiber behind for the garbage, the VitaMix is able to liquify the whole fruit, including the fiber and skins - where most of the nutrients reside - so your juice is much more nutritious.
Serve these pancakes topped with extra blueberries and some nice maple syrup or raw honey.
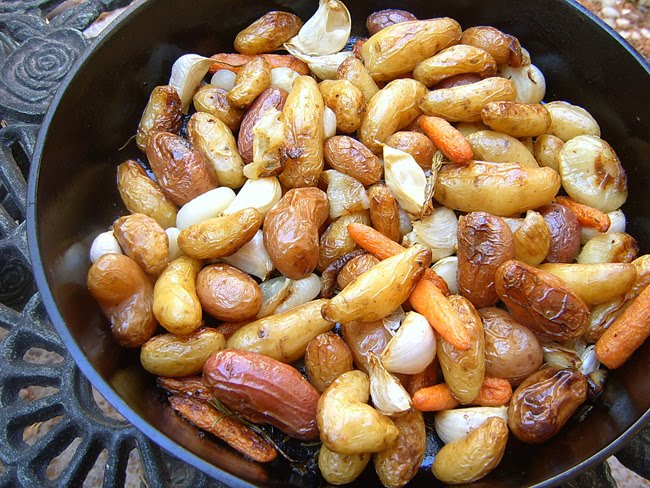
One of my most used recipes is this one for roasted root vegetables out of the How to Cook Everything cookbook by Mark Bittman. It is very easy, very customizable, and the end result looks a little fancy and is delicious. I love that I can choose whatever vegetables appeal to me. I take the author's advice and usually include carrots and onions in the mix along with some kind of potatoes. I personally also try to always add turnips and rutabagas, since I don't use these great tubers enough otherwise.
For the batch I prepared and photographed above, I used a mix of fingerling potatoes and miniature onions procured from the Molto Farmer's Market here in Las Vegas. This weekly event was started by Mario Batali and his restaurant team as a way to bring fresh sustainable produce to the area. On the day Stefanie and I visited, we also picked up some purple carrots, black radishes, fermented black garlic (heavenly!), heirloom tomatoes, and some other wonderful treats.
Regarding the recipe, you will see that the directions are specific about the quantity of vegetables to use, but for a long time I have measured by how much will fill my 10-inch cast iron skillet. Of course, cast-iron isn't required, but I do think it is the best choice if you have one because some magic happens there. The other personal touch I have been adding lately is improvising a mustard sauce to have on the side. If you are interested, I give some approximate proportions for that at the end.
Roasted Root Vegetables
4 Tbs. olive oil 1 1/2 to 2 lbs. mixed root vegetables, such as carrots, potatoes, sweet potatoes, parsnips, turnips, shallots (leave whole), and onions, peeled and cut into 1 1/2 to 2 inch chunks Several sprigs fresh thyme or about 1 Tbs. fresh rosemary leaves (optional)
Salt and freshly ground black pepper to taste
1 head garlic, broken into cloves (Leave the garlic unpeeled.
You peel each clove before you eat it.)
Minced fresh parsley leaves for garnish
1. Preheat the oven to 425°F. Place the olive oil in a large roasting pan on top of the stove and turn the heat to low. When the oil is hot, add all the vegetables (except the garlic), along with the thyme or rosemary. Sprinkle them with salt and pepper and cook them briefly, shaking and stirring so that everything is coated with oil. Place the pan in the oven.
2. Cook for 30 minutes, opening the oven and shaking the pan once or twice during this period. Add the garlic and stir the vegetables up; at this point they should be starting to brown. If they are not, raise the oven temperature to 450°F.
3. Continue to cook, stirring and shaking every 10 minutes or so, until the vegetables are tender and nicely browned, at least another half hour. If the vegetables soften before they brown, just run them under the broiler for a minute or two. If they brown before they soften, add a few Tbs. of water to the pan and turn the heat down to 350°.
4. Garnish and serve hot or at room temperature.
Simple Mustard Sauce
6 Tbs. olive oil
2 Tbs. red wine vinegar
1 Tbs. Dijon mustard
1/4 tsp. salt
1/4 tsp. dried tarragon
Whisk ingredients together until they are completely amalgamated into a creamy sauce. A small blender like the Magic Bullet is ideal here.
This past spring Dennis and I traveled to Sedona, Arizona, where we were very graciously hosted by my friend, Meredith. Sedona itself is amazingly beautiful. Its distinctly southwestern architecture is so unobtrusive, it seems to disappear into the landscape, and the dramatic backdrop of peculiar, bold-colored rock formations, dotted with rich green pines, junipers, cacti and succulents, all set against an impossibly blue Arizona sky, create an idyllic setting for a weekend getaway. We will definitely be going back.
We were fortunate to have Meredith's insider viewpoint on what is, understandably, a heavily touristed town. Following a Saturday morning hike, Meredith took us to lunch at a beautiful little cafe called Wildflower Bread Company. It was there that I had one of the most delicious sandwiches I have ever eaten, a menu item they call "Roasted Sweet Potato," featuring, as you might expect, sweet potato, as well as fresh mozzarella, fig confit, tomato, arugula, marinated fennel and balsamic vinaigrette on herb focaccia. I insisted we return the next day so that I could enjoy it one more time before we headed back to Las Vegas, and as I finished my last bite I became determined to try to reproduce this fabulous combination of flavors at home. I'm proud to announce that Katherine and I did manage to create a respectable version of our own and we're very excited to share it with you.
The first task at hand was to bake our own focaccia. We used a recipe from the Food Network site, with a few minor adjustments. Instead of 2 tsp. of rapid-rise yeast, we used 3 tsp. of active dry yeast (and allowed the yeast to stand in warm water for a longer period of 10 minutes). We replaced the standard sugar with turbinado, and changed the flour quantities to 2 c. all purpose flour and 1 1/2 c. whole wheat flour. Of course, if you're short on time, any nice store-bought artisan bread will do.
The rest was relatively easy. I cut a sweet potato lengthwise into half-inch-thick slices, lined a baking pan with aluminum foil, laid the slices out in a single layer, brushed them with olive oil and sprinkled them with sea salt, then roasted them in the oven at 425 degrees, flipping them once part way through, until they began to brown and the flesh was soft. In the meantime, Katherine was busy caramelizing some onions, a process she will describe for you below.
Once all the ingredients were prepared we assembled the sandwich, starting with a layer of royal fig fruit spread I found at Wholefoods, followed by a slice of roasted potato, a layer of fresh mozzarella, then arugula tossed with a balsamic vinaigrette dressing, and finally a generous helping of caramelized onions. I also recommend spreading the top slice of bread with more balsamic vinaigrette to intensify the balsamic flavor, if you're a fan like we are.
Katherine, about to enjoy the fruits of our efforts
Katherine's Note:I was in heaven to make these sandwiches with Stefanie. And I loved making foccacia from scratch, enough to make me wonder why I don't do this every day. It is such a decadent kind of bread to bake, with the rich aromas and flavors from the olive oil and rosemary.
The biggest secret about making great caramelized onions is patience. It takes a long time compared to other kitchen tasks for the onions to cook down. I usually use one large or two medium sized onions. I cut these in half and slice them. Then I add a couple of tablespoons of oil to a skillet set to medium heat, add the onions, and cook them until they start to brown, approximately 15 minutes. It is important to stir frequently. The final touch for me is to throw in a tablespoon of balsamic vinegar, and a bit of sugar. I think I used roughly a 1/2 tbsp of Rapidura. Then I let this cook for another few minutes until the onions are nicely glazed.
A former chef I know once told me he likes to make a batch of caramelized onions regularly to keep in the fridge to serve along with all kinds of dishes, and it makes sense to me.
I want to lastly send some gratitude out to my friend Ayla, who I just realized takes me to a different location of Wildflower Bread Co. when I visit her in Tempe, AZ, and we pair it with visiting the most wonderful bookstore, Changing Hands, next door.
So William Shakespeare wrote in his timeless play, Hamlet. Admittedly, wit is not my strong point, and perhaps being long-winded is where I go astray. I brainstormed for a long time about a more succinct title for this post, but in the end I was willing to forego cleverness in favor of capturing the soul of this recipe. In the interest of clarity and informativeness, I give you Pesto Grilled Vegetables with Israeli Couscous, Quinoa and Baby Chickpeas. If you're the impatient type, I'll throw you a bone. This recipe is quick enough to make for lunch.
The inspiration came from a package of "Harvest Grains Blend" I picked up at Trader Joe's. It's a mixture of Israeli couscous (which is basically tiny round pasta balls), orzo (rice-shaped pasta also known as risoni), baby garbanzo beans (also known as chana dal) and red quinoa. The brilliant thing about this blend is that all of these "grains" take about the same amount of time to cook. I find that this mix is a little short on the quinoa, so I supplement from my own stash. Quinoa, by the way, is a superfood, with very high protein content and a unique combination of amino acids, such that NASA is considering it for its Controlled Ecological Life Support System [more on the benefits of quinoa]. Just like Tang, if it's good enough for astronauts, it's good enough for me. (All right, in the interest of full disclosure, I've never tasted Tang and I don't blindly follow celebrity endorsements, but hopefully if you haven't already tried quinoa, you'll give it a go. It's delicious and really good for you.)
I grill my veggies on a George Foreman Grill. It sits on my kitchen counter and gets a lot of use in the summertime. If you don't already own one, I highly recommend it; just make sure you get the model with the removable grill plates, because otherwise it's a real pain in the neck to clean. This reminds me of a quote from one of my favorite comedians, the late Mitch Hedberg. "This shirt is dry clean only... which means it's dirty." Infer what you will.
The exact proportion of veggies to grains doesn't really matter here. You can't go wrong; these quantities are provided as a guideline. If you don't usually work with asparagus, here's how to prepare it: Hold the spear at both ends and bend it until it breaks. The natural breaking point is where the tough, woody part ends and the soft, yummy edible part begins. This tip came to me courtesy of my brother-in-law Ed, a former NYC chef. Thanks, Eddie!
One more note: This recipe is vegan except for the Parmesan cheese on top (and maybe the pesto sauce depending on your choice of sauce). I think the cheese is essential to the flavor of the dish, but if you're vegan, I'm sure you already know of a few alternatives. Some high-quality sea salt should do the trick, for example.
Ingredients: - 1 cup Trader Joe's Harvest Grains Blend (or your own mixture of Israeli couscous, orzo, baby chickpeas and red quinoa) - 1/4 cup (additional) red quinoa - 1 3/4 cup water - 1 tablespoon olive oil - 1 red pepper, deseeded and sliced into rounds - 1 zucchini, sliced into rounds - 12 asparagus spears, broken to remove the woody bottom part - Half a small eggplant, sliced into rounds - 6 stuffing-sized portobello mushrooms, sliced - Half a large red onion, sliced into rounds - 3 tablespoons of pesto sauce (I recommend Basiltops Dairy-free Vegan Pesto, which I get at WholeFoods, but any ready-made pesto sauce will do... or of course you can make your own) - Freshly grated Parmesan - Salt and pepper to taste
Method: Put the water, olive oil and grains into a saucepan and bring to a boil. Cover, reduce the heat, and simmer for about 13 minutes. While the grains are cooking, heat up the grill, slice up your veggies and toss them on. I brush them with olive oil and sprinkle them with salt once they're on there. Keep an eye on them, as different veggies take different amounts of time to cook. Once they're grilled, chop them up into smaller pieces. By now, the grains will be done (I recommend tasting them to be sure - all the water should have evaporated), so add your chopped grilled veggies right to the cooking pot, and then your pesto sauce. Stir to combine. Spoon the mixture out into bowls and top with some freshly grated Parmesan cheese.
Katherine's Note: I think this little recipe is deserving of its long magnific title; it is so awesomely easy and delicious. I love TJ's for offering such a creative and appealing mix with this blend. I looked around online to see if anything else is written about it, and someone suggested incorporating it into a soup, which I think is a good idea also.
It is fun to read that NASA article about the potential use of quinoa on the long space mission. It is actually an easy-to-read and informative summary about the grain. I am a big fan of having quinoa as a breakfast cereal, and I had read somewhere that it is important to rinse it in cold water before using, but didn't remember why. In the NASA article, it's explained that the grain has a coating of saponin glycosides, a bitter chemical that the plant naturally uses to deter insects. These saponins can presumably interfere with digestion, and may taste bitter anyway, so be sure to rinse.
And I am happy too that you brought up the long term space mission because it gives me a chance to plug one of the best short stories I have read in recent years: Lostronaut, by Jonathan Lethem. Luckily it is available online. If you are a lover of fiction, check it out.